Below shows a quick run down of the 8 Key steps needed when creating a SSL VPN on a fortigate.
– Create a user
– Create Address Object
– Enable SSL config
– Create Portal
– Create User Group
– Create Auth Policy
– Create Access Policy
– Create Static Route
1. Create User
This will be the user that would to access the SSL VPN. Create a Username and Password and select the Authentication method. The guide will talk you through SSL using the local database.
2. Create an Address Object
At this point the address objects can be created, this will basically be the IP pool used for the SSL VPN. It is best practice to create one global pool and then one pool for each group (using the address range) that will be using this service.
This example shows 10.10.10.0/24 “SSL_Global_” and Smaller sections i.e SSL_Finance, etc.. can be added using the range command.

3. Enable SSL
SSL should already be enabled, but you can check by navigating to VPN > SSL > Config (this was done on V4mr3, so may have changed). Here you can set some basic configuration such as port, dns, timeout and encryption.
Here you will also need to apply the SSL IP pool. Basically it is the IP the SSL users will get when they authenticate. The global is normally addded here, however you can add the individual pools also, just in case the glocal causes problems (like not getting correct IP when ssl users login).

4. Create Portal
The next step is to create the portal, it is best practice to create individual portals for each user group. Here you also need to ensure that the IP pool (for the specific group) is assigned to specific portal. E.g. SSL_Finance portal gets assigned SSL_Finance_Pool IPs.
To do this click Tunnel Mode > Edit > IP pools > Select Range > Click OK (to save) > Click Apply > Click OK (to save).
It is important to follow the above procedure when adding the IP range to the portal, as there have been times when it doesn’t save properly if you don’t use the above steps.
You can also select whether the users access should be split tunneling or not here. Unless you want all the users traffic to go out through the firewall web acess etc… then leave this ticked.
Step 4 ensures that the user groups gets the correct IP range from the global pool.

5. Create a user group.
When creating a specific group, you need to allow SSL VPN access and then assign it to the desired portal.
Eg. Finance users gon in a Finance group, and get assigned the Finance portal (or whatever portal they use). Assigning this portal means that when a user in this group logs in, it will given the IP pool assigned to the portal we have selected.
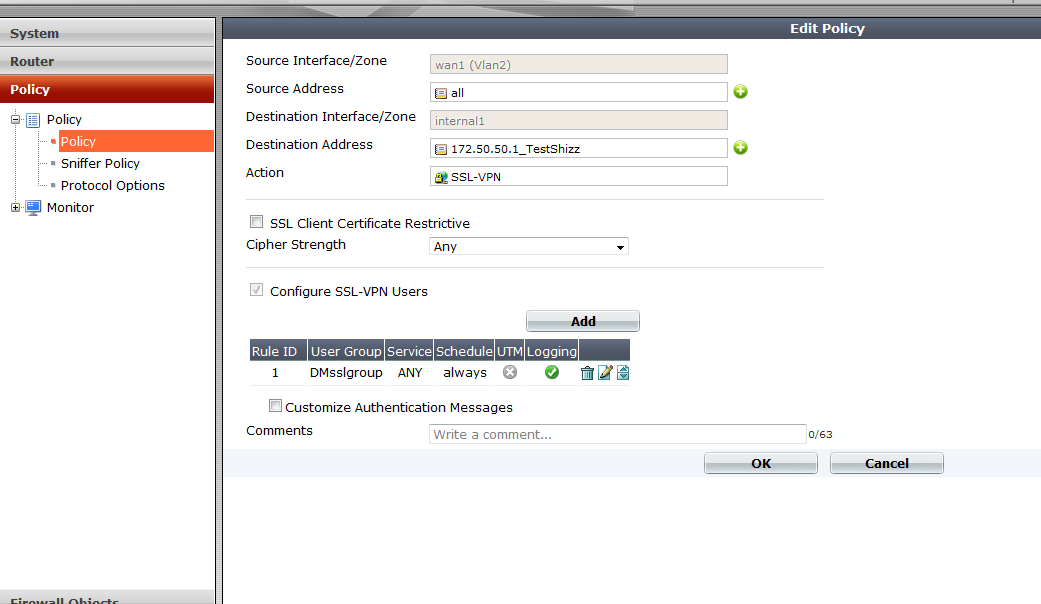
6. Create the Auth policy.
Creating the auth policy should go in the direction WAN > Internal. The policy that needs to be in place is the end destination you want the SSL users to access. What this basically does is insert the route in the routing table for the SSL user when they authenticate (verified on a windows machine with the ‘route print’ command).
When creating the policy ensure you select action as ‘SSL-VPN’ then tick the ‘configure SSL-VPN-Users’ and add the user group you want. Remember this process is to ensure that a route is added in the ssl users machine. If the route is not in this policy the user wont be able to get there!
7. Create the Access Policy
Just like any other policy a firewall, the access is where the source is sslvpn tunnel interface to internal (or wherever you want the users to get to) (ssl.root > internal). You also can create the policy to be subject to the correct IP range (the pool they are assigned).
8. Add static Route
Finally we add a static route for the ssl users IP address. This is so that return traffic will know where to go when returning to the ssl users. This is simple enough
We are basically saying where does the ssl global pool live? Down the ssl.root interface.
This is all that is needed to get a ssl vpn up and running, adding users, creating new groups and other features can be done using the same steps shown above.
